Pages

Monday, January 30, 2012

DIY Fleece Tie Blanket

For Christmas this year, I made my new little niece and H & J fleece tie blankets. I've never done anything like this before but it was super easy and the finished product was perfect! I bought 1 meter of fleece for the top {for my niece E's blanket} and one meter for the bottom. For H & J I bought 1.5 meters each for the top and 1.5 meters each for the bottom. E is almost 6 months now {where did the time go!?} and my girlies are 5 and 2 years. Looking back, I should have purchased 2 meters for H's blanket because I wanted it for more of a blanket to sleep with, instead of a throw. {I cut a bit too much of the edges off and the finished product was more square while J's is more rectangular.}

So, here's E's finished blanket:

I just love the way it turned out! I chose baby pink with cream hearts for the top and a solid cream for the bottom. Nice baby girl colours don't ya think? I sure do!

So first what you need to do is lay your fabrics on top of each other {wrong sides together} and trim the edges so they are pretty much even. {Yes, I realize mine doesn't look very even. Clearly my eyes are crooked.}

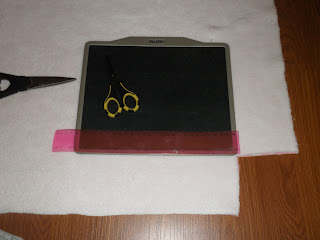
Make a 5" square template from some cardboard or something sturdy. {I think I did 4" on E's and 5" on H & J's blankets.} Put the template on the corner of the blanket and cut the square out as shown in the picture. You are going to do this on all four sides of the blanket.


Next take something heavy or something you can use as a guide and place it along the top where your 5" cut is. {This is so you don't cut deeper than the 5".} Lay a ruler on top or below your fabric and cut 1" from the end of the fabric. You can also just use the aprox width of your thumb, which is what I did on the other two blankets.

Cut "fringes" every inch or so all the way around your blanket.

Next comes the tedious and boring fun part... tying your blanket together! Simply do a regular knot. I only did one knot for each tie on all three blankets... I know the ones for H & J ended up coming undone, so I would double knot each fringe. Yes it takes a while, so my suggestion would be to put a movie on if you are making multiple blankets because you can pretty much zone out and tie the night away.

Once they are all tied, you're done!


Enjoy your new blanket! My girls love theirs! They are both into Care Bears right now, so I chose the same pattern for the tops, and pink for H's bottom and purple for J's bottom {to match their bedrooms.} Sorry for the low quality pics. I took them right before wrapping them up for Christmas.


I think I need to make one for the living room because it's a wee bit chilly at night and I like to lounge on the couch while watching tv once the girlies go to bed.

Happy blanket making! It's easy to make and would be a good gift for kids too!

~Chrissy~

Friday, January 27, 2012

It's a crafty kinda day...

So it's been what... two months since my last post?? Sorry about that! I really do enjoy dabbling into the world of blogging, but as every one knows, Christmas is a crazy time of year, we had the flu and then we were trying to get back on some kind of schedule after the holidays were over. But I'm back now, so let's pretend there was no time between these posts {I can keep a secret if you can!} I can't promise it won't happen again, but I can say that I'm going to try to post an entry at least once a week. I have soooo many craft ideas, home reno projects and scrapbook pages to share with all of you!

Ok, so moving on.... it's a PA day today and that means no school for H and no daycare for J {which also means I'm home until the evening! Yahoo!} It also snowed today and I really don't feel like going outside so I decided to pull something off of my craft board on Pinterest. {If you haven't been to Pinterest, you MUST go!! It's be next best addiction to Facebook ever!}

Here's the original Pinterest pin that I saw. It's a pretty simple craft, but I had to figure out what size to cut the pictures and such, so I'm just going to add all that into my post today. Here's the finished puzzle we made...


Now for how I did it. Here's the materials you'll need:

Popsicle Sticks {more like the big tongue depressors}
4x6 pictures of your choice
Mod Podge
Sponge brush {or paint brush for mod podge}
Paper Trimmer {optional, can use scissors and a ruler instead.}

Here's my original picture before turning it into a puzzle. {It's actually our family Christmas card from this year! Photos were taken by Jennifer Hall, and she also designed our card too.}


First you're going to cut 1/4" to 1/2" off the width of your picture.In my case it was from the height because it was a portrait layout, not landscape. 

Next you cut the picture into 5/8" strips.


Brush a layer of Mod Podge onto the stick and then put your picture strip on top.


Continue that until all your strips are on the sticks.


Mod Podge creates a protective barrier on top of papers, pictures and the like. This is ideal for "little hands" to make it last longer... and less sticky. Just pour it on top of the picture, and brush it on.


Don't worry! It dries clear!!


Even H was in on the action! {Yes, it's THAT easy.}


Put it on some parchment or wax paper {or newspaper} and let it dry.


It was so easy, we actually made 4 puzzles today!

And the girls had fun putting them together after they were all dry. All in all it took me maybe 25 mins to do all 4 puzzles and for them to dry. Easy Peasy!!
Oh, and I had to throw this one in there... Doesn't J look like a doll today!? So cute!


Happy Crafting!! Hope to post again soon! {Like a week or earlier soon!}

~Chrissy~

Friday, November 18, 2011

Let Her Eat Cake!!

My little big girl is soon turning 5. FIVE years old!? Where has the time gone!?!?

H really wanted to choose her own cake this year and has landed on a princess castle cake. One problem... I don't make cakes and the one she wanted was like $150. YIKES!!
I had something like this in mind...


H wanted something more like this...


You all know me by now. Super cheap, but good quality {if you can get it super cheap} is the way to go. Soooooo... one of my BFF's sister lent me a castle cake kit she had. {HUGE thank you to NB for that!!} I know na-thing-a about cake making or decorating but another of my BFF's has made cakes for her kiddies in the past and agreed to help me! {WOOT, WOOT!} Here's the picture story of my cake making journey. {With a few comments here and there... Ok, ok maybe just a hint more than a few.}

Started out with 4 cakes.
Iced the bottom so it would hold still while on the board, then iced the bottom cake, and top cake.


I couldn't find a 6" round cake pan on such short notice {shout out to all the procrastinators!} so I used my juice jug to "trace" and out line and then cut it out with a butter knife. 


I have to be honest here and say the HARDEST part, was icing the cakes! I am {clearly} not talented when it comes to cake making, but H loves it all the same! {And it helps that this part of the cake is hidden behind turrets!} 

I used a Wilton Cake decorating kit and made the little stars around the tops.  Then I forgot to take pictures for a while!

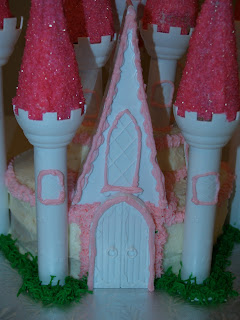
Here's the towers coming together. They are part of the Wilton Romantic Cake kit. They are PLASTIC!! {Cut the work by 75% I'd say. And they look pretty impressive when it's done! }My friend JJ was my partner in crime helper! We melted white chocolate discs and dipped the towers in it and placed it on the cake base to hold it into place. {Worked GREAT!} Then I took the icing and outlined the windows and the door.
Time to add the tops of the towers! I used waffle ice cream cones and JJ iced them. Then we rolled them in decorators sugar! YUMMMM!

I put more white melted chocolate in the tops of the turrets to hold the cones in place. Worked just like glue once it dried! 


JJ did the grass and it looks awesome! Had NO clue you could get icing to do that!!

The finished product!! Not too shabby for a non-cake-maker eh!? {Yep, Canadian and PROUD of it!}
Here's a few other angles and shots of it.
Back


10 towers for 10 kiddies at her party! Yep, each kiddies gets to eat a cone! {insert evil sugar endued laugh here}


I hope you've enjoyed my journey! It wasn't all that hard, but a little time consuming. But with the right tools {and the right help!} you can pretty much accomplish anything!

Chrissy